Crafting is a fantastic way to bond with your children while fostering their creativity and fine motor skills. With 2024 bringing new trends and ideas, it’s the perfect time to dive into some fun and easy DIY craft projects with your kids. Whether you’re looking for activities to do on a rainy day or want to keep your little ones engaged during school holidays, these craft projects are sure to delight both kids and parents alike. Here’s a guide to some easy and enjoyable DIY craft projects to try with kids this year.
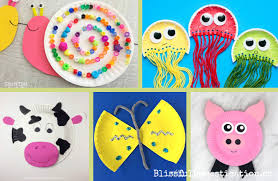
1. Paper Plate Animals

Paper plates are versatile and inexpensive, making them an ideal base for a range of creative projects. Creating paper plate animals is a fun way to explore different shapes and colors with your children.
Materials Needed:
- Paper plates
- Crayons or markers
- Construction paper
- Glue
- Scissors
- Googly eyes (optional)
Instructions:
- Prepare the Plate: Use the paper plate as the base for your animal.
- Decorate: Draw and color your animal using crayons or markers.
- Add Features: Cut out shapes from construction paper for ears, tails, and other features, and glue them onto the plate.
- Finishing Touches: Attach googly eyes if desired and let everything dry.
2. DIY Slime
Slime-making is a popular activity among kids and can be customized with various colors and textures. It’s a great sensory activity that is sure to keep children entertained.
Materials Needed:
- White glue
- Baking soda
- Contact lens solution
- Food coloring (optional)
- Glitter (optional)
Instructions:
- Mix Glue and Baking Soda: In a bowl, combine 1 cup of white glue with 1/2 cup of baking soda.
- Add Color: Stir in a few drops of food coloring and glitter if desired.
- Add Contact Lens Solution: Slowly add 1/2 cup of contact lens solution, mixing until the slime starts to form.
- Knead: Once it starts to come together, knead the slime with your hands until it reaches the desired consistency.
3. Handprint Art
Handprint art is a wonderful way to capture the size of your child’s hands while creating memorable pieces of art. This craft is easy and can be turned into various creative projects.
Materials Needed:
- Non-toxic paint
- Paper or canvas
- Paintbrushes
- Wet wipes or a damp cloth
Instructions:
- Prepare the Paint: Use a paintbrush to apply non-toxic paint to your child’s hand.
- Print the Hand: Press the painted hand onto the paper or canvas to create a handprint.
- Add Details: Once the paint dries, you can add additional details such as drawing around the handprint to turn it into an animal or a flower.
- Display: Frame or hang the finished artwork to showcase your child’s creativity.
4. Egg Carton Caterpillars
Egg cartons are great for creating fun and colorful caterpillars. This craft is perfect for teaching kids about insects and recycling materials.
Materials Needed:
- Egg cartons
- Paint
- Paintbrushes
- Pipe cleaners
- Googly eyes
- Glue
Instructions:
- Prepare the Egg Carton: Cut out individual cups from the egg carton.
- Paint: Let your child paint the cups in bright colors.
- Assemble the Caterpillar: Glue the painted cups together to form a caterpillar shape.
- Add Features: Attach pipe cleaners for antennae and googly eyes for the face.
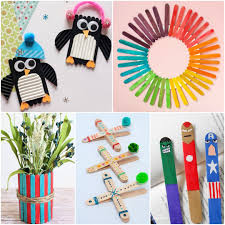
5. Popsicle Stick Crafts

Popsicle sticks are versatile and can be used to create a variety of crafts. From picture frames to mini structures, this project encourages creativity and fine motor skills.
Materials Needed:
- Popsicle sticks
- Glue
- Paint
- Decorations (e.g., stickers, glitter)
Instructions:
- Create the Base: Arrange and glue popsicle sticks together to form the base of your craft (e.g., a picture frame or small structure).
- Paint and Decorate: Paint the sticks and add decorations as desired.
- Let Dry: Allow the craft to dry before using or displaying it.
6. DIY Bird Feeders
Creating bird feeders is a fun way to engage kids with nature. It’s a simple project that can be made using common household items.
Materials Needed:
- Toilet paper rolls or pine cones
- Peanut butter or lard
- Birdseed
- String
Instructions:
- Prepare the Base: Spread peanut butter or lard over the toilet paper roll or pine cone.
- Add Birdseed: Roll the coated item in birdseed until it’s fully covered.
- Hang: Attach a piece of string and hang the feeder outside for the birds to enjoy.
7. Bubble Wrap Printing
Bubble wrap printing is a creative way to make textured art. This project is both fun and educational, helping kids learn about textures and patterns.
Materials Needed:
- Bubble wrap
- Paint
- Paper
- Rolling pin or paintbrush
Instructions:
- Prepare Bubble Wrap: Cut the bubble wrap to fit your paper.
- Apply Paint: Brush or roll paint onto the bubble wrap.
- Press and Print: Press the painted bubble wrap onto the paper to create a textured print.
- Dry: Allow the print to dry completely before displaying.
8. DIY Bead Bracelets
Bead bracelets are a simple and enjoyable craft that allows kids to design their own accessories. This project helps with hand-eye coordination and creativity.
Materials Needed:
- Beads (various colors and shapes)
- Elastic string
- Scissors
Instructions:
- String Beads: Let your child choose and string beads onto the elastic string.
- Measure and Cut: Measure the string to fit around your child’s wrist and cut it.
- Tie Off: Tie a knot at the end of the string to secure the beads.
- Wear: Enjoy wearing the new bracelet or gift it to someone special.
9. Rock Painting
Rock painting is a delightful craft that combines art with nature. Painted rocks can be used for decoration or as part of a treasure hunt.
Materials Needed:
- Smooth rocks
- Acrylic paint
- Paintbrushes
- Sealant (optional)
Instructions:
- Prepare the Rocks: Clean and dry the rocks.
- Paint: Use acrylic paint to create designs on the rocks.
- Seal: Apply a clear sealant if you want to make the rocks weather-resistant.
- Display: Place the painted rocks in your garden or use them in a scavenger hunt.
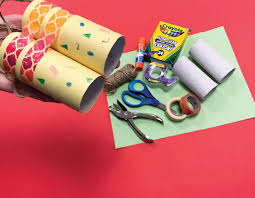
10. Paper Roll Binoculars

Creating binoculars from paper rolls is a fantastic way to inspire imagination and encourage outdoor play. This craft is easy and can be customized with different colors and designs.
Materials Needed:
- Empty toilet paper rolls
- Paint or markers
- String
- Glue
- Scissors
Instructions:
- Prepare Rolls: Decorate the toilet paper rolls with paint or markers.
- Assemble: Glue the rolls together side by side.
- Add String: Attach a piece of string to the binoculars for wearing around the neck.
- Play: Use the binoculars for pretend play or outdoor exploration.
Conclusion
These easy DIY craft projects are perfect for kids of all ages and are sure to provide hours of creative fun. From painting and decorating to crafting and building, there’s something here for every young artist. Not only do these projects help develop fine motor skills and creativity, but they also offer a wonderful opportunity for quality family time


