Drawing is a powerful way to express creativity and capture the world around us. One of the essential skills for any artist is mastering shading and lighting techniques. These techniques bring depth and realism to drawings, making them more dynamic and lifelike. Whether you’re a beginner or looking to refine your skills, understanding the fundamentals of shading and lighting is crucial. This guide will cover the basic drawing techniques for shading and lighting, offering tips and exercises to help you improve your art.
Understanding Shading and Lighting
Shading and lighting are fundamental concepts in drawing that help create the illusion of depth and dimension on a flat surface. Here’s a breakdown of these concepts:
- Shading refers to the technique of using various tones to depict the way light falls on an object. It involves creating a gradient from light to dark to simulate the three-dimensional form of the object.
- Lighting is about understanding how light interacts with surfaces. Different light sources and their positions affect how shadows and highlights are cast.
1. Basic Shading Techniques

1.1. Hatching
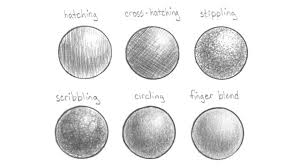
Hatching is a fundamental shading technique that involves drawing parallel lines to create areas of shade. The density and direction of the lines can vary to produce different effects.
- Straight Hatching: Draw evenly spaced parallel lines in one direction. The closer the lines are, the darker the shading.
- Cross-Hatching: Overlay another set of parallel lines at a different angle to create a more complex texture. The intersections of these lines can produce a range of shades.
1.2. Stippling
Stippling involves creating texture and shading using small dots. The density and distribution of the dots control the darkness of the shade.
- Light Stippling: Use fewer dots spaced apart to create a light shade.
- Dense Stippling: Increase the number of dots and reduce spacing to achieve a darker shade.
1.3. Blending
Blending smooths out shading to create a more natural transition between light and dark areas. This technique is often used with graphite pencils.
- Blending Stumps: Use blending stumps or tortillons to gently blend graphite and achieve smooth gradations.
- Fingers or Tissue: For a more informal approach, you can use your fingers or a soft tissue to blend the pencil marks.
2. Basic Lighting Techniques
2.1. Light Source Placement
Understanding where the light source is positioned is essential for accurate shading. Common light sources include:
- Direct Light: Casts strong shadows and clear highlights. Objects will have sharp, defined shadows.
- Diffuse Light: Creates softer shadows and highlights. Light is scattered, leading to a gradual transition from light to shadow.
2.2. Highlight and Shadow
- Highlight: The area of an object that receives the most direct light. It should be the lightest part of the drawing.
- Shadow: The area that is shielded from light. It should be the darkest part of the drawing and varies in intensity based on the light source.
2.3. Core Shadow and Cast Shadow
- Core Shadow: The darker area on an object where light is blocked by the form itself. It helps define the shape of the object.
- Cast Shadow: The shadow cast by the object onto other surfaces. It follows the direction of the light source and can help ground the object in space.
3. Practical Exercises

3.1. Sphere Exercise
Draw a simple sphere and practice shading it to create a realistic 3D effect. Focus on:
- Light Source Position: Place the light source at different angles to see how shadows and highlights change.
- Gradient Shading: Use smooth transitions from light to dark to simulate the roundness of the sphere.
3.2. Cube Exercise
Draw a cube and apply shading techniques to illustrate the effects of light on its surfaces. Pay attention to:
- Different Faces: Shade each face of the cube based on its orientation to the light source.
- Shadow Placement: Draw the cast shadow of the cube on a surface to give it a sense of depth.
3.3. Still Life Drawing
Set up a still life with simple objects like a bowl of fruit or a group of cylinders. Practice shading and lighting by:
- Observing Light: Note how light interacts with each object and how it affects the shadows and highlights.
- Applying Techniques: Use hatching, stippling, or blending to represent the different textures and forms.
4. Common Mistakes and How to Avoid Them
4.1. Inconsistent Light Source
Ensure the light source remains consistent throughout your drawing. Changing the light source mid-drawing can lead to unrealistic shading.
4.2. Over-Blending
While blending is essential, overdoing it can result in a loss of texture and definition. Maintain some degree of contrast to preserve the drawing’s integrity.
4.3. Ignoring Shadow Placement
Proper shadow placement helps ground objects in space. Ensure shadows are consistent with the light source and accurately reflect the object’s position.
5. Tools and Materials

5.1. Pencils
- Graphite Pencils: Use different hardness levels (e.g., 2B, 4B) for varying shades.
- Colored Pencils: For colored drawings, choose pencils that blend well and provide a range of shades.
5.2. Blending Tools
- Blending Stumps/Tortillons: Useful for smoothing graphite and creating gradients.
- Kneaded Eraser: Ideal for lifting and lightening areas without damaging the paper.
5.3. Paper
Choose high-quality drawing paper that can handle various shading techniques. Textured paper can add depth, while smooth paper is better for fine details.
Conclusion
Mastering basic drawing techniques for shading and lighting is crucial for creating realistic and dynamic artworks. By practicing hatching, stippling, blending, and understanding the principles of light and shadow, you can enhance the depth and dimension of your drawings. Remember to experiment with different techniques and tools to find what works best for you. With time and practice, you’ll develop a strong foundation in shading and lighting that will elevate your drawing skills to new levels.


